In this tutorial we'll integrate MySQL into our REST API that we built in part 1 of these series. If you haven't checked out that part yet, I advice you to do so before continuing with this tutorial.
Prerequisites
In order to be able to follow along you will need:
Project Structure
First pull down this github repo.
Then install it by running npm init in a terminal within the project root.
Then create these new files ./config/db.js, ./database.js and ./setup.js in the root folder.
This means that your project root should now look like so:
Setting up MySQL
Follow this tutorial in order to setup the MySQL environment on your computer. You will be ready in no time!
Creating the Database
It's almost time for us to actually start writing some code! Only thing we need to do is install a dependency called mysql2 which will help us connect to and make queries to our MySQL Server.
So in the root of our project, run the following command
Terminal
npm i mysql2Next up, we'll want to input all the credentials required to connect to our MySQL Server.
Add the following to db.js located in the config folder
Replace password123 with the root password that you decided earlier when setting up MySQL Community Server
./config/db.js
module.exports = {
  host: "localhost",
  user: "root",
  password: "password123",
  database: "mydb",
};
Next, we'll create a setup script which will connect to our MySQL Server, create a database and then add a messages table to it.
In setup.js copy/paste the following code which I will explain in detail further down.
setup.js
const mysql = require("mysql2");
const CONFIG = require("./config/db");

const SETUP_DB_QUERY = `
  CREATE DATABASE IF NOT EXISTS ${CONFIG.database} DEFAULT CHARACTER SET 'utf8';

  USE ${CONFIG.database};

  CREATE TABLE IF NOT EXISTS messages (
    id int(11) PRIMARY KEY NOT NULL AUTO_INCREMENT,
    text varchar(255) NOT NULL
  );
`;

function createConnection(config, query) {
  const { host, user, password } = config;
  const connection = mysql.createConnection({
    host,
    user,
    password,
    multipleStatements: true,
  });

  connection.connect(function (err) {
    if (err) throw err;
    console.log("Connected to MySQL server!");
    createAndSetupDatabase(connection, query);
  });
}

function createAndSetupDatabase(connection, query) {
  connection.query(query, function (err) {
    if (err) throw err;
    console.log("Database created and setup!");
  });
}
createConnection(CONFIG, SETUP_DB_QUERY);
Defining the variables
We begin by importing the mysql2 dependency that we installed earlier. Also, we import the database configuration from ./config/db.js
Next we define a template literal string and store it in a variable that we name SETUP_DB_QUERY. Here we're using SQL (Structured Query Language) syntax in order to first create the database based on the database name that we defined earlier in ./config/db.js by running an initial SQL statement which will create the database if it doesn't exist.
We then define that we now want to use this database when preforming the next upcoming SQL statements of this query.
Lastly we run a statement which creates a table named messages in our newly created database. This table will have two columns id and text. The id column will be an integer and also an auto incrementing primary key used for targeting the messages later on when we'll start updating/deleting them. The text column will be a varchar, a column which will allow us to store string data (text messages) within it.
Defining the functions
As can be seen in the code snippet we have 2 functions defined in our file. One of them is createConnection which holds the responsibility of creating a connection to the MySQL Server. The other function createAndSetupDatabase which is pretty much self explanatory, but if not, will create and setup the database, tables and columns for us.
createConnection
So let me break down what happens in these two functions in detail.
The createConnection function takes 2 arguments. So the first parameter defined in the function is config which will be the configuration data needed for establishing a connection to the MySQL Server and the second one is the query that we want to run as soon as we've connected successfully.
Initially we define 3 variables in the function by destructuring the config object. These 3 variables are host, user & password.
Next we define another variable connection which will be the connection, the result of a method on the mysql object also called createConnection. We pass an object to this method which has 4 properties; the 3 variables that we destructured from the config object earlier as well as multipleStatements. The latter one is used to tell mysql that we want to be able to create a query that consist of multiple statements, the 3 statements that we defined in the template literal string earlier.
Once the connection is resolved and stored in in our connection variable, we call the connect method from it. This method takes a callback function which will be called as soon as we're successfully connected to the MySQL Server. We check if there's an error using the err parameter and if there is one we throw it. If not, that means that we're good to go and create our database and tables so we call our next function createAndSetupDatabase and pass the connection as a first argument and the query as a second argument to it.
createAndSetupDatabase
We start off by calling the query method of the connection that passed and as a first argument of this this function. This method takes two arguments, a query and a callback function. We start of by passing our query template literal string and lastly define the callback function which will work similar to what I described earlier about the connection.connect's callback function. If there aren't any thrown error here, that means that our database is going to be setup.
Lastly we'll need to call the createConnection function and pass the CONFIG as well as the SETUP_DB_QUERY variables.
Now it's time to save the changes you made and soon we're going to run the script to see if it works! But first, we're going to modify our package.json so that it looks like this:
package.json
1{
2  "name": "node_express_mysql_tutorial_p1",
3  "version": "1.0.0",
4  "description": "",
5  "main": "index.js",
6  "scripts": {
7    "start": "nodemon index.js",
8    "setup": "node setup.js"
9  },
10  "keywords": [],
11  "author": "Christopher Af Bjur",
12  "license": "ISC",
13  "dependencies": {
14    "express": "^4.17.1",
15    "mysql2": "^2.1.0"
16  },
17  "devDependencies": {
18    "nodemon": "^2.0.4"
19  }
20}
21
Note that you should add the highlighted line to your package.json in case you're following along based on the Github repository that I linked earlier.
Save the changes.
Now run the following script in a terminal at the root of your project:
Terminal
npm run setupAnd voilá! You should get a terminal response printing the successful console messages that we defined in our functions letting you know that the database has been created and setup.
Preparing the API
Now that you've created and setup the database it's time that we make use of it!
We'll start off by modifying the file database.js in our project root. It should then look like this:
database.js
const mysql = require("mysql2");
const CONFIG = require("./config/db");

const pool = mysql.createPool({
  connectionLimit: 10,
  ...CONFIG,
});

module.exports = pool;Here we're creating a connection pool which will handle our database connections. It's similar to the mysql.createConnection method which we used in setup.js but differs in some aspects. I will spare you the details on this one but basically using a connection pool instead of a "normal connection" whill enhance our servers performance. This is something that we didn't have to keep in mind while creating the database with the script in setup.js since it would be ourselves requesting that MySQL connection, once. Here on the other hand, we create a connection which will be used by the actual API that we're building - meaning that multiple connections most likely will occur simultaneously (such as when different users request our endpoints, from different connections, as they will in our publically open API).
Ok, so what are we doing here?
We require the mysql2 dependency aswell as our database configuration.
We then create a connection pool by calling mysql.createPool. The createPool method takes an object as an argument, where we define a connectionLimit and set it to 10. This means that the pool will limit the currently active connections to 10 and if this value is exceeded, the 11th connection will have to wait until an active one closes. Don't worry if it's difficult to understand that - just know that it will enhance our API's performance.
We then destruct our properties from the CONFIG object into the createPool calls argument object - which is everything needed to connect to MySQL.
We then export the connection pool so that we can use it in our route functions to request data from MySQL.
Now we are done with database.js. Good job so far! Next - this is what I want you to do:
So, save the changes and head over to index.js
Import the connection from database.js and store it in a variable called db.
We can also remove the defined MESSAGES variable now, since we're going to replace the simulated database from the previous tutorial with a real database.
This means that we can also get rid of the file messagesTable.js so go ahead and delete that file.
With these new changes made, the first part of index.js (before the actual routes/endpoints are defined) should look like this:
index.js
const express = require("express");
const db = require("./database");
const app = express();
const port = 3000;

app.use(express.json());
Migrating POST request handlers
Now the time has come to migrate our request handlers that we created in the last section. Yay!
There's going to be quite a bit of changes for each handler so my advice is that you copy/paste the upcoming code snippets and replace them with the old ones in your project and then after each snippet, I'll explain in detail what we're doing. Note that since I've already explained how the app request methods and their callbacks work, I'll focus on the code within the callback functions. Incase you need a recap, have a look here. Sound good? Ok. Let's go!
So let's begin with our post request handler.
index.js
app.post("/", function (req, res) {
  const query = "INSERT INTO messages (text) VALUES (?)";
  const values = [req.body.text];

  db.query(query, values, function (err, result) {
    if (err) throw err;
    const message = { id: result.insertId, text: values[0] };
    res.status(200).send(message);
  });
});We define a query variable in which we store an SQL query string which will insert data into the text column of our messages table in our database, once we run it. Note that we've specified a placeholder in the form of a question mark. All the placeholders that we use in a query string will be replaced with the values stored in the array that we've defined underneath, called values. So in this case we have 1 placeholder in the query string, meaning it will be replaced with the first index of the values array, which in this case is the request body text that we passed to this endpoint (the message that we want to save in the database).
If we'd want to insert multiple values, we could use more placeholders in the correct positions of the SQL query string and have more indexes in the values array and they would be replaced in ascending order. This means that the first placeholder defined would be replaced with index 0 of the values to replace and the second placeholder would be replaced with index 1 of the values to replace. But in this case, we only have 1 placeholder to replace with a value.
You may ask yourself; "Ok, but why the heck can't I just use a template literal and define an expression instead of a placeholder that will be replaced later on?"
Well, the short answer is... We want to avoid being targets for SQL injection attacks.
I will not go into detail on injection attacks but basically it means that a malicious user could modify data in our database without our permission.Next, we use the query method of our connection that we stored in a variable called db that we previously defined. This method takes 3 arguments.
The query which holds the SQL statement to create a new row in our messages table and populate the column value text with a value.
The values array which indexes will replace the the placeholders of the query.
A callback function that will be called as soon as MySQL has completed the operation.Now, in the callback function we have two parameters err and result. If we get an error we throw that error.
If we didn't get an error, we can assume that we have a result from MySQL. We get the insertId, from the result object, which is the index of the last row inserted into the messages table of our database. We use this insertId as well as the first values index, which will be the request.body.text, to construct a message object that we send back as a response with a response status code of 200.
Migrating GET request handlers
Time to migrate our GET request handlers. As you probably remember from the last tutorial of these series, we have two types of GET endpoints. One for getting all the messages and the second for getting a message with a specific id.
So let's begin with the one for getting all the messages.
index.js
app.get("/", function (req, res) {
  const query = "SELECT * FROM messages";

  db.query(query, function (err, result) {
    if (err) throw err;
    const messages = result;
    res.status(200).send(messages);
  });
});In the callback function, we define a SQL query string which will tell MySQL to give us all rows from the messages table in our database.
In the db.query call we pass the query as well as a callback function. Note that we do not pass any values here like in the POST request - simply because we do not have any data to insert. This time we only want to get everything in the messages table.
As usual we throw and error if there is one. If not, we get the result and for clarity we save it in a variable called messages.
Just like before we send all those messages back as a response with a status code of 200.
Now it's time to migrate our second GET request endpoint.
index.js
app.get("/:id", function (req, res) {
  const id = parseInt(req.params.id);
  const query = "SELECT * FROM messages WHERE id = ?";
  const values = [id];

  db.query(query, values, function (err, result) {
    if (err) throw err;
    const found = result;

    if (found.length > 0) {
      res.status(200).send(found);
    } else {
      res.status(404).send({ msg: `No message with id ${values[0]} found!` });
    }
  });
});We get the id from req.params.id which will be of string type and parse it into an integer that we store in a id variable.
We create a query and a values array.
Similar to the POST request, we pass query and values as arguments to the db.query call as well as a callback function.
We throw an error if there is one, as usual.
If there's no error, we create a variable found and store the result in it for clarity.
Since the result is always an array, and we stored it in found, we create a condition to check if there were any found items (if the length of the found array is greater than 0). If it is, we send the found array as a response with a statuscode of 200.
If on the other hand found is an empty array, meaning we couldn't find anything in our database based on the id that we passed, we send an object as a response with the statuscode 404 (not found), containing a error message.
Migrating PUT request handlers
Time to migrate the PUT request endpoint.
index.js
app.put("/:id", function (req, res) {
  const id = parseInt(req.params.id);
  const query = "UPDATE messages SET text = ? WHERE id = ?";
  const values = [req.body.text, id];

  db.query(query, values, function (err, result) {
    if (err) throw err;
    const updated = [{ id: values[1], message: values[0] }];

    if (result.affectedRows === 0)
      return res
        .status(404)
        .send({ msg: `No message with id ${values[1]} found!` });

    res.status(200).send(updated);
  });
});A lot of the syntax here might look similar to the previous request handlers that we've migrated. How ever, note here that the query uses two placeholders and therefore two indexes in the values array, which is the req.body.text (t updated message text) as well as the id for the message that we want to update the message text for.
In the callback we handle potential errors as usual.
If there's no error, we store an object that consist of values data, in an array that we pass to a variable called updated. This is the data which we will send as a response in case we were able to update the specified message in MySQL.
Next we create a condition where we check if result.affectedRows is equal to zero. This means that we were unable to find and update any message in our database with the specified id and therefore we'll return here and send an error message as a response.
If on the other hand there were more than zero affected rows, which means that we actually succeded to find and update a message with the specified id, we send a response with the status code 200 and pass the updated array within that response.
Migrating DELETE request handlers
Almost done now! Time for migration of the final endpoint where we handle DELETE requests.
index.js
app.delete("/:id", function (req, res) {
  const id = parseInt(req.params.id);
  const query = "DELETE FROM messages WHERE id = ?";
  const values = [id];

  db.query(query, values, function (err, result) {
    if (err) throw err;
    const deleted = [{ id: values[0] }];

    if (result.affectedRows === 0)
      return res
        .status(404)
        .send({ msg: `No message with id ${values[0]} found!` });

    res.status(200).send(deleted);
  });
});As you might notice, the callback function of this route is somewhat similar to the PUT request. We get the id, create the query and add the id in the values array which will replace the placeholder of the query.
In the db.query function call's callback we handle the error.
If no error, we create a deleted array which holds an object with an id property that contain the id that we have requested to DELETE.
If there weren't any affected rows, we return and send a response with a status code of 404 and an error message.
If, there were affected rows, we send the deleted array as a response with a status code of 200.
Testing the endpoints using cURL
If you have curl installed on your computer you can follow along in this section. Note that all Mac computers, with operating system version equal to or greater than OSX, comes with cURL pre-installed.
Obviously your Express server needs to be running before you try to make any requests to it. So if it's not already running, start it.
Terminal
npm run startExecuting a POST request
Next we'll make a POST request from a terminal. We'll send the request to http://127.0.0.1:3000 which is equal to localhost, at port 3000 which is the port that we use for our application. We pass a JSON request body with the message text. We also pass a request header that defines that the data that we're sending is JSON data.
Terminal
curl -X POST http://127.0.0.1:3000/ -d '{"text":"New message"}' -H "Content-Type: application/json"When sending this request from your terminal, you should get a response back that looks like this:
Terminal Response
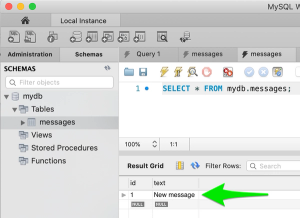
{"id":1,"text":"New message"}Cool! So now we've successfully created a new message with a POST request!
We can also confirm that this message was saved in our database by doing the following:
Open up MySQL Workbench.
Click on the Local Instance that you created earlier.
From the Schemas tab, right click the messages table and from the menu that pops up select Select Rows - Limit 1000 as shown in the image below.
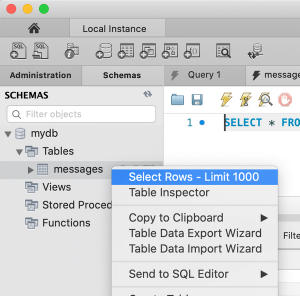
You should then see the message that we just added through our POST request.
Executing GET requests
Now let's try to make a GET request, fetching all the messages that our server has stored so far. We should be able to fetch the 1 message that we added with the POST request. And of course if you were to add more messages, these messages should also be fetched with this request.
So let's test our GET endpoint which will return all the messages stored in the database so far.
Terminal
curl -X GET http://127.0.0.1:3000/Boom! Here's all of our messages (currently just one if you haven't sent multiple POST requests).
Terminal Response
[{"id":1,"text":"New message"}]Next, let's try the GET endpoint which will return a specific message based on the passed request parameter id.
So, this time, let's pass a request parameter 1 when making the GET request.
Terminal
curl -X GET http://127.0.0.1:3000/1Voila! We get the message with the requested id.
Terminal Response
[{"id":1,"text":"New message"}]But what if we request an id that doesn't exist in our database? Let's see.
Terminal
curl -X GET http://127.0.0.1:3000/1337Ah! We get back the error object that we previously defined - telling us that the message with id 1337 was not found. Perfect!
Terminal Response
{"msg":"No message with id 1337 found!"}Executing a PUT request
Now let's try updating a message. Let's update message with id 1.
Terminal
curl -X PUT http://127.0.0.1:3000/1 -d '{"text":"Updated message"}' -H "Content-Type: application/json"We get back our updated message as a response. Awesome!
Terminal Response
[{"id":1,"text":"Updated message"}]Let's also confirm the update in MySQL Workbench.
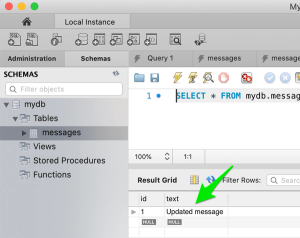
As you can see, the text column was updated from New message to Updated message. Awesome!
Executing a DELETE request
Finally, let's try to delete a message. Let's delete message with id 1.
Terminal
curl -X DELETE http://127.0.0.1:3000/1Works like a charm!
Terminal Response
[{"id":1}]And the confirmation:
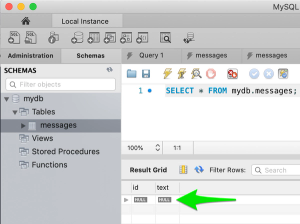
Wooha! No message with id 1 in our database, which means that our DELETE request worked!
Testing the endpoints using Postman
So if you were unable to test your endpoints with cURL, or just didn't feel like doing so, the time has come to test our endpoints using Postman.
Let's start off by making sure that our Express server is running. As you already know, we run it by executing the following command from our project root.
Terminal
npm run startExecuting a POST request
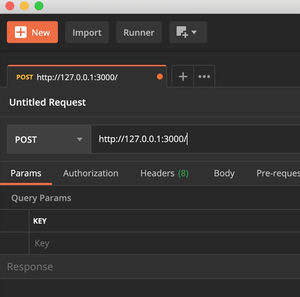
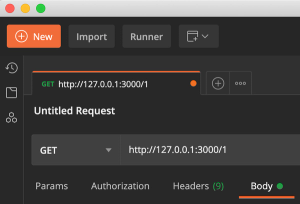
So, open up Postman and from the top menu, select File > New Tab.
Then select POST from the dropdown menu and input http://127.0.0.1:3000/ as the request url. Note that this is the same as inputting http://localhost:3000/ so choose whatever you prefer.
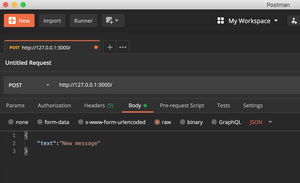
Next click on Body just below the request url bar.
Select raw in the radio button selection and in the dropdown to the right of the radio buttons, select JSON. Then press the Send button.
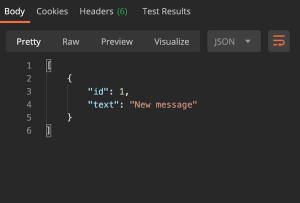
Now in the bottom section of Postman, you should see a response consisting of the message that we just created, as well as a Status of "200 OK".
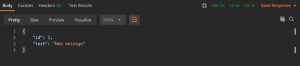
Awesome! We've just created our first message by sending our first POST request.
We can also confirm that this message was saved in our database by doing the following:
Open up MySQL Workbench.
Click on the Local Instance that you created earlier.
From the Schemas tab, right click the messages table and from the menu that pops up select Select Rows - Limit 1000 as shown in the image below.
You should then see the message that we just added through our POST request.
Executing GET requests
Now let's try to make a GET request, fetching all the messages that our database has stored so far. Since we've only made one POST request so far, we should be able to get that message. How ever if you've made more than one POST request to create more messages, you should be able to fetch them all from this GET request.
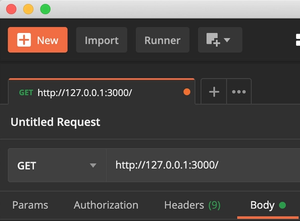
So let's test our GET endpoint which will return all the messages stored in the database so far. We can do this by simply just changing the request type to GET from the top left drop-down menu. Note that we can leave the request body data as is - it will not be sent with the GET request anyways. Press Send when you've applied that change to the request type.
Now we should get some data back which we can find in the response body section of Postman.
Cool! So we were able to get all the messages that we had stored in our database (only one in my case, since I've only made 1 POST request so far). Now let's test our other GET endpoint which will return a specific message based on the request parameter passed with the request.
Simply add an id to the request URL. Let's get message with id 1. Then press Send again.
This time the response body should look like so (Yes I know it looks exactly the same as the previous response if you haven't made any extra POST requests):
Doesn't it just feel good when you get whatever you request? Love it.
Ok, so what happens if we try to request a message with an id that doesn't exist? Let's try it out. Let's use 1337 as an id.
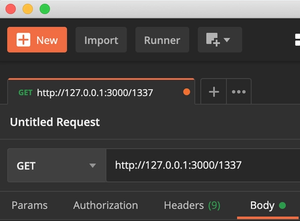
Press Send and see what happens.
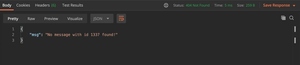
Wonderful! We're getting our error message that we defined earlier, with the statuscode of 404 which means that the item that we requested was not found on the server.
Executing a PUT request
Now let's try updating a message. Let's update message with id 1.
So first, change the request type to PUT and make sure that the request parameter is 1 in the request url.
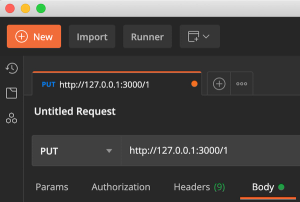
Then before sending this, let's modify the request body.

Now press Send.
And the response body should now return our updated message.
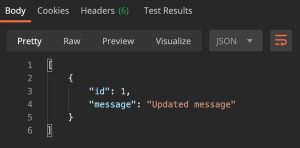
Let's also confirm the update in MySQL Workbench.
As you can see, the text column was updated from New message to Updated message. Awesome!
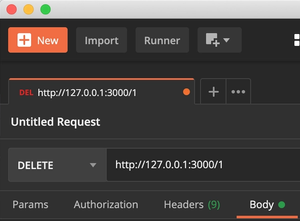
Executing a DELETE request
Finally, let's try to delete a message. Let's delete message with id 1. So change the request type to DELETE and make sure that you pass the id 1 as a request parameter.
We get the deleted message back as a response within the response body.
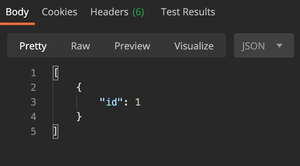
And the confirmation:
Wooha! No message with id 1 in our database, which means that our DELETE request worked!
Final words
You're now one step closer to being table to construct a fully functional REST api using Node.js, Express & MySQL. In the next tutorial of these series, we will take the API that we just built to the next level and deploy it to a cloud service.
You can find the final source code for this tutorial here.