In this tutorial we'll deploy our REST API to Heroku so that we can make external requests.
Prerequisites
In order to be able to follow along you will need:
Verified Heroku account. You can read more about it here before starting with this tutorial as it means that you need to verify your identity with a credit card. In case you don't want to do it, do not keep on reading since a step in this tutorial requires a Heroku addon which can only be used if your a verified user. If you don't feel comfortable with this - wait untill I create a tutorial that doesn't rely on a service provider that needs verification.
Project Structure
First pull down this github repo.
Then install it by running npm install in a terminal within the project root.
You may delete ./setup.js as it will not be needed anymore.
This means that your project root should now look like so:
Getting started with Heroku
Heroku is a very popular cloud based Platform as a Service (PaaS). It's exactly what we need to get our server up and running in the cloud with ease.
Installing Heroku
Start by downloading and installing the Heroku CLI by following this guide.
Create an Heroku account by following this link.
Open up a terminal and login to Heroku by typing heroku login and pressing Enter. You will get redirected to a page where you can login.
Setting up Github remotes
Open up your browser, navigate to Github and create a new repository.
Now, open up a terminal in the root project folder and change the remote to your newly created repository by running git remote set-url origin https://github.com/USERNAME/REPOSITORY.git
Confirm that the new remote is your remote by running git remote -v
Now let's push this project to our remote Github repo by running git add . && git commit -m 'My first commit' && git push origin master
Setting up Heroku
Now in your project root, open up a terminal and run heroku create
When Heroku has created the app for us, we want to make sure that our Heroku deployment remotes have been setup. So in your terminal run git remote -v and you should be able to see two new remotes.
Preparing MySQL environment
Creating the Database
Next we need to setup a MySQL environment in Heroku. We can do this by running heroku addons:create cleardb:ignite. This will add an addon to our Heroku app which creates a MySQL database for us, using the provider ClearDB and their free plan called ignite. You can read more about it here.
Note that in order to add this addon, you have to be a verified Heroku user. Which means that you need to provide a credit card to your Heroku account. You can read more about that here.
Now run heroku config | grep CLEARDB_DATABASE_URL in order to retrieve the database url for our newly created database.
Extracting the Credentials
Now we need to extract our database credentials from the database url. So based on the last terminal command, your database url should look something like this:
mysql://bd0cf5bxxxxxxx:dcdxxxxx@us-cdbr-east-02.cleardb.com/heroku_fb6515adxxxxxxx?reconnect=true
So based on this url there are 4 things that we want to extract. The user, password, host and database
Now that you know what we're going to extract you can think of the database url like so:
mysql://user:password@host/database?reconnect=true
So in my case, my credentials would be:
user: bd0cf5bxxxxxxx
password: dcdxxxxx
host: us-cdbr-east-02.cleardb.com
database: heroku_fb6515adxxxxxxx
Log in to the Database
Now that we've extracted the credentials, let's try to login to the database. We'll do that by using MySQL Workbench. In case you haven't installed it already, you can find a tutorial on how to install it and setting up a new connection in it, here under section #2.
So now, let's create a new connection in MySQL Workbench and input your saved credentials. Pick whatever Connection Name you prefer. So in my case it would look like so:
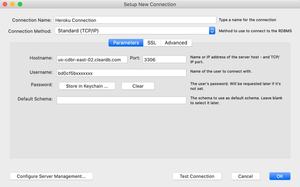
Note that you have to click on Store in Keychain... to input your password.
When you're all done, click on Test Connection. Once you've done this you might see a warning message.

If you see this message, just click Continue Anyway and then save your new connection by clicking OK.
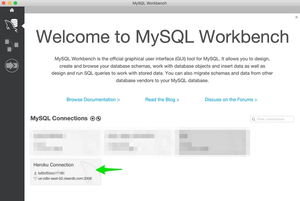
Now in your MySQL Workbench window, just click on your newly created connection to connect to it.
Creating the table
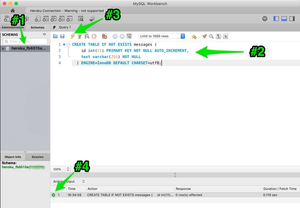
In the next window that opens, do the following steps (check the image to fully understand). Also copy this SQL query to your clipboard.
Query
CREATE TABLE IF NOT EXISTS messages (
    id int(11) PRIMARY KEY NOT NULL AUTO_INCREMENT,
    text varchar(255) NOT NULL
  ) ENGINE=InnoDB DEFAULT CHARSET=utf8;
Double click on the database so that its font gets bold, meaning that this is the selected database that we're going to make a query against.
Paste the SQL query here.
Click the yellow blizzard icon in order to run the query.
Confirmation that the query was successfully run without any errors.
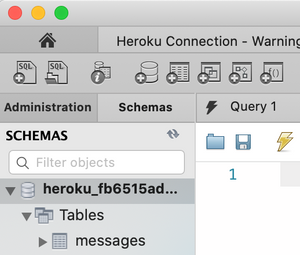
Now let's see if our messages table was created. So expand the database by clicking on it in the left side-panel. Note that you might have to click on the little refresh button if you cannot see the messages table.
Adding Environment Variables
Now the time has come to start connecting our Express server with the MySQL server that we’ve created.
In order to do that we’ll have to pass our database credentials to our server. We could simply do that by replacing the local MySQL server credentials with our cloud hosted MySQL credentials in ./config/db.js. How ever, it’s a really bad idea to store such secret piece of information in the source code. The source code is something that we store in version control (Github) and therefore code that might become visible to third parties. We don’t want anyone with access to our Github repositories to be able to see all the secret information of all our services by just viewing the configuration in version control. What if someone gets access to our Github account for that matter? Bad idea!
So how do we solve this? We use environment variables!
An environment variable is a type of variable that can be set in the environment where the server is hosted. These variables can then be read by the server itself. This means that we can pass secret information to the server without revealing it in version control.
There is a popular NPM package called dotenv that we can use to handle this. It will help us create and read the specified environment variables for our projects.
Start by installing dotenv by running npm install dotenv
Create a file named .env in your root project folder.
Next we need to define the environment variables to be created as well as their values. We define this in the .env file that we just created. Note that I'm using the credentials that I extracted from the database url that we maintained earlier and that you should replace these values with your database credentials.
.env
DB_USER=bd0cf5bxxxxxxx
DB_PASSWORD=dcdxxxxx
DB_HOST=us-cdbr-east-02.cleardb.com
DB_NAME=heroku_fb6515adxxxxxxx
Note that it’s super important that we also add this file to our .gitignore file so that it stays out of version control. So it should look like so:
.gitignore
node_modules
.env
Now we need to read these environment variables in our source code. So go ahead and modify ./config/db.js like so:
./config/db.js
require("dotenv").config();

module.exports = {
  host: process.env.DB_HOST,
  user: process.env.DB_USER,
  password: process.env.DB_PASSWORD,
  database: process.env.DB_NAME,
};
Here we require dotenv and call its config method. This will read your .env file, parse the contents of it and apply the defined environment variables as key/value pairs to the process.env object.
We use the environment variable keys of the process.env object to assign their values to our database config object that we export.
Next in our index.js file, we want to change the port so that we use the one defined as an environment variable if it exists. Note that this is not a environment variable that we have to define ourselves, it's defined automatically by Heroku. This means that we'll use the Heroku port when we're running our server on Heroku (production) and fallback to port 3000 while we're running our server locally (development). Note that if we don't apply this change, we're going to run into problems when trying to request data from our Heroku hosted endpoints.
So the beginning of your index.js file should now look like this:
index.js
1const express = require("express");
2const db = require("./database");
3const app = express();
4const port = process.env.PORT || 3000;
Note
The values for the environment variables that we defined in .env in this section is the credentials for the Heroku database. While you're developing, you might want to change these values to the credentials of your local database.
Modifying package.json scripts
Now we are almost set! Almost time to deploy to Heroku! We just need to modify package.json a tiny bit.
The reason being is that we don’t want nodemon to be run in production. Thats just a dependency that help us during local development. As soon as we deploy our server to production, Heroku will automatically execute npm run start for us and within our current start script we use nodemon. So lets change package.json by adding a new dev script for development and modifying the start script to run with Node instead of Nodemon. Also note that we can remove the setup script aswell since we've removed the setup.js file which we didn't need anymore. So your package.json should look like this:
package.json
1{
2  "name": "node_express_mysql_tutorial_p2",
3  "version": "1.0.0",
4  "description": "",
5  "main": "index.js",
6  "scripts": {
7    "start": "node index.js",
8    "dev": "nodemon index.js"
9  },
10  "keywords": [],
11  "author": "Christopher Af Bjur",
12  "license": "ISC",
13  "dependencies": {
14    "dotenv": "^8.2.0",
15    "express": "^4.17.1",
16    "mysql2": "^2.1.0"
17  },
18  "devDependencies": {
19    "nodemon": "^2.0.4"
20  }
21}
22
Deployment
Time for deployment! Run the following command to deploy to Heroku by pushing to the heroku remote:
Terminal
git add . && git commit -m "Deployment" && git push heroku masterNow wait for the deployment to complete.
After the deployment to Heroku is finished, let's commit to our Github remote origin as well.
Terminal
git push origin master
Now, lets inspect our server logs on Heroku to confirm that everything went as expexted, meaning our server started without any errors, in the Heroku container.
Navigate to heroku.com
Login
Click on your app
Click on More, in the upper right of the page
Click on View Logs from the dropdown menu
Hmm! Looks like there was an error after all:
Error
2020-08-30T09:56:41.822738+00:00 app[web.1]: npm ERR! node_express_mysql_tutorial_p2@1.0.0 start: `node index.js`
2020-08-30T09:56:41.822740+00:00 app[web.1]: npm ERR! Exit status 1
2020-08-30T09:56:41.822740+00:00 app[web.1]: npm ERR!
2020-08-30T09:56:41.822741+00:00 app[web.1]: npm ERR! Failed at the node_express_mysql_tutorial_p2@1.0.0 start script.
2020-08-30T09:56:41.822742+00:00 app[web.1]: npm ERR! This is probably not a problem with npm. There is likely additional logging output above.
2020-08-30T09:56:41.921747+00:00 app[web.1]:
2020-08-30T09:56:41.921963+00:00 app[web.1]: npm ERR! A complete log of this run can be found in:
2020-08-30T09:56:41.922136+00:00 app[web.1]: npm ERR!     /app/.npm/_logs/2020-08-30T09_56_41_823Z-debug.log
2020-08-30T09:56:41.982939+00:00 heroku[web.1]: Process exited with status 1
2020-08-30T09:56:42.033031+00:00 heroku[web.1]: State changed from starting to crashed
How so?
Well, we haven’t defined any environment variables in Heroku yet! This means that when our Heroku server tried to connect to the database, all configuration values from our file ./config/db.js was undefined and therefore our server couldn’t connect to the MySQL server.
Remember that .env file that we created earlier and how we added it to our .gitignore file? That means that it was never pushed with the rest of the project when we pushed it to Heroku with the deployment push. This is actually expected and is exactly what we want - because we want the sensitive data only to be known to the environment that runs the server.
So how do we define these environment variables in Heroku you might ask. Well, that’s what I’m going to show you next.
Click on your project on the Heroku dashboard
Click on Settings
Click on Reveal Config Vars
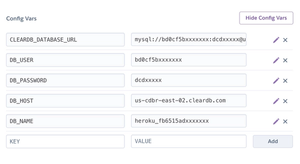
Now define the environment variables and their values here, identical to what you have in the .env file. Once you’ve created an environment variable, just click Add in order to add another one.
So it should look like something like this. Note that the CLEARDB_DATABASE_URL was added automatically by Heroku.
If you prefer, it's also possible to add environment variables from the Heroku CLI that you installed in your terminal. If you feel like going with this approach instead of from the Heroku website, you can add the environment variables like so:
Terminal
heroku config:set DB_USER=bd0cf5bxxxxxxxOk, so now that you've added the environment variables with your database credentials to Heroku, it's time to restart the server to see if it works as expected this time.
Go to your Heroku Dashboard
Click on your app
Click on More in the upper right of the page
Click View Logs from the dropdown menu
Then again click on More
But this time from the dropdown menu, click Restart all dynos and confirm.
Now that you've applied the environment variables and restarted the server, you should see in your logs that the server starts and runs successfully.
Testing the API
So, since you already learned how to test your endpoints in the previous tutorial, I will not go into detail here. However, good to know is that previously when we ran our server locally, we sent the API requests to http://127.0.0.1:3000/ and as you might already have figured out the new URL to call our Heroku hosted API is the name of your heroku app followed by .herokuapp.com.
So as an example, if my Heroku app is called nameless-shelf-54728, that means that the URL to my API would be http://nameless-shelf-54728.herokuapp.com/.
So if I were to test my POST request endpoint, using cURL, i'd run:
Terminal
curl -X POST http://nameless-shelf-54728.herokuapp.com/ -d '{"text":"My first message"}' -H "Content-Type: application/json"I get the expected result:
Terminal Response
[{"id":1,"text":"My first message"}]Which means that I now know that everything works! Woohoo!
Note
Since we're using ClearDB as our MySQL provider on Heroku, our message ids will auto increment a little differently than we might be used with so far. You can read more on that here.
Final words
You've finally finished these tutorial series on creating a fully functional REST API with Node.js, Express & MySQL as well as deploying it to Heroku for public access.
You can find the final source for this tutorial here.