Mac computers originally come with the Terminal app pre-installed. The Terminal app works great for most scenarios but are lacking some features that will reduce productivity in the long run.
For this reason, most Mac users turn to an enhanced terminal app called iTerm2.
To mention a few of iTerm2's features, we have:
Split Panes
Hotkey Window
Search
Autocomplete
You can read more about the features of iTerm2 here.
There are various types of command line shells that we can use with our terminal applications. It's likely that you're familiar with the unix shell called Bash (it comes pre-installed on Mac computers). Bash works great for most scenarios but are lacking some goodies that we can achieve with another shell: z shell.
Z shell, commonly called ZSH, is basically an extended version of Bash with loads of new features such as support for plugins and themes which will make our lives easier. Since it's based on the same shell as Bash, ZSH has many of the same features and switching over to ZSH from Bash is very easy.
Installing iTerm2
We'll start off by installing iTerm2. Just go here, download the installer unzip the zip file and move the file iTerm to your Applications folder of your Mac.
Installing OhMyZsh
Now it's time to say goodbye to good old Bash and instead welcome ZSH.
In order to make our lives super easy, we'll also welcome a ZSH framework called OhMyZsh which will open up a world of useful plugins and themes that we can use with simplicity.
So, in order to install ZSH with OhMyZsh, either go to this page and follow the instructions, or just copy the following curl script (don't worry, chances are that you already have curl installed on your Mac since it usually comes pre-installed):
Terminal
sh -c "$(curl -fsSL https://raw.github.com/ohmyzsh/ohmyzsh/master/tools/install.sh)"Now that you have the installation script copied to the clipboard, go ahead and open up iTerm2 and run the script there.
The installation begins and you might be prompted to input your user password in order to allow changing the shell from Bash to ZSH.
Installing our first theme
OhMyZsh comes with loads of different themes which boosts colors/fonts and some even show github statuses directly in the terminal. I've found a really good one by Wes Bos called Cobalt2. That's the one we're going to use in this tutorial.
Open an iTerm terminal and start by cloning the Cobalt2 repo:
sh
git clone https://github.com/wesbos/Cobalt2-iterm && cd Cobalt2-itermThen we’ll want to copy the theme file to our OhMyZsh theme folder by running:
sh
cp cobalt2.zsh-theme ~/.oh-my-zsh/themes/Now open your ZSH configuration file ~/.zshrc with your favorite text editor. In my case I’ll use VSCode by running:
sh
code ~/.zshrcThen change the theme variable to ZSH_THEME=cobalt2 and save the changes.
Now back to iTerm, we'll run the following command in order to see the changes:
sh
source ~/.zshrcNow you might note that the terminal window looks kind of ugly so far with question mark symbols etc. This is because we need to install some required fonts. Let's do that next.
Installing Powerline Fonts
Download and install the required fonts by running:
sh
git clone https://github.com/powerline/fonts && cd fonts && ./install.shNow in iTerm, go to Profiles > Open Profiles
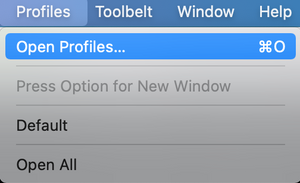
Then click Edit Profiles…
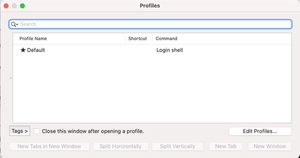
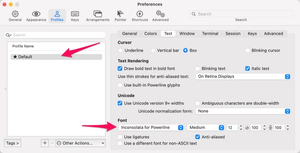
Make sure the Default profile is selected and go to the Text tab and under Font select Inconsolata for Powerline
Defining Cobalt2 Colors
Click Colors (right pane).
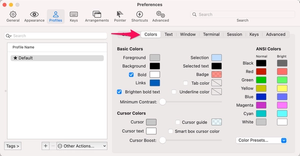
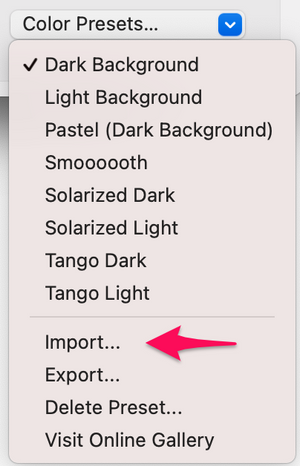
Now click on Color Presets… to the lower right and select Import.
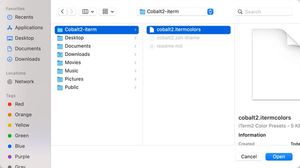
Now navigate to the cobalt2.itermcolors file which is located in the Cobalt2 repository you previously cloned and click Open.
Next, make sure cobalt2 is selected in the list by clicking Color Presets... again.
Setting up Hotkey Window
Now let’s configure a Hotkey Window so that we can always reach our terminal by pressing a hotkey.
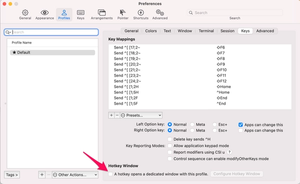
Open Keys tab and check the box under Hotkey Window
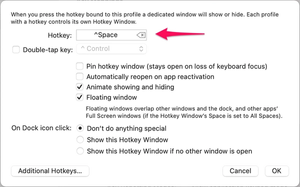
In the window that opens, click on the Click to Set button and select a hotkey. A pro tip is to use CTRL + SPACE. After you’re done, press OK.
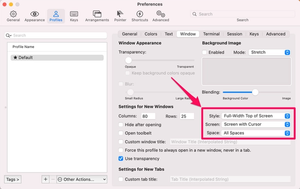
Go to Window and input the following settings:
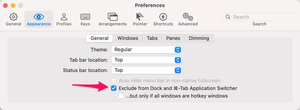
Now go to Appearance and select the General tab, then check Exclude from Dock…
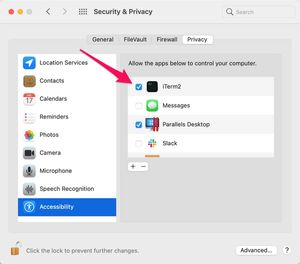
Note that when you do this, you might get a popup regarding iTerm accessibility permissions. In that case you'll need to check the box in the Accessibility tab under the Security & Privacy settings of your Mac:
We're finally done with all of the iTerm preferences so you can now go ahead and close the iTerm preferences window.
Load iTerm on Startup
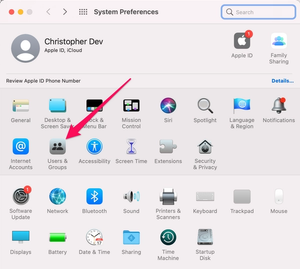
The last thing to do now, in order to get a smooth feeling with the Hotkey Window settings we've defined, we want iTerm2 to start in the background when we boot our system. In order to achieve this, we have to configure it in our System Preferences of our Mac.
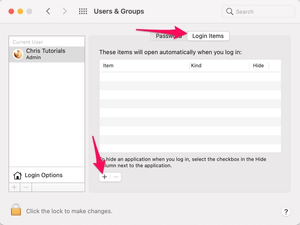
Go to your Mac’s System Preferences and then Users & Groups
Click on Login Items and on the plus sign +
In the window that opens, search for iterm, select it and and click Add
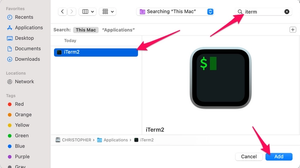
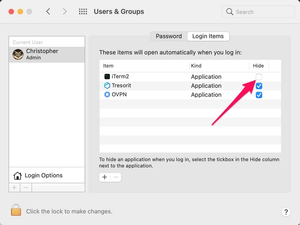
Make sure the checkbox is unchecked.
Reboot
We're now done with all the settings and are almost done with this tutorial. All we have to do now is reboot our system or just logout from the system and log back in (in order to trigger a real startup where iTerm2 runs automatically).
When you've successfully rebooted. You should see a small iTerm2 icon in the top right corner of your screen. From now on, this is where we can reach iTerm by hand and access preferences etc.
But we no longer need our hand (or at least mouse) to open up iTerm. Simply hold the hotkeys you defined earlier and iTerm should fade in smoothly from the top. Also, in order to close it again, just press the same hotkeys and iTerm will close.